Time inexorably runs forward and now white flies are flying outside the window, slowly sinking to the ground and covering everything around with a snow-white fluffy veil. However, despite the cold, the soul is warm and joyful. And all because suddenly appeared snowflakes herald the onset of the New Year. The most important holiday of the year is already very close, which means it's time to think about New Year's decor, gifts and, of course, crafts.
The days are getting shorter and the evenings are getting colder and longer. What to do with yourself, and even more so with your little fidgets, when it is already too dark for outdoor winter fun? Well, crafts, of course. New Year's crafts can be made from the most unexpected materials: cocktail tubes and much more. But there are also more traditional materials, such as paper. In this article, we have collected for you more than 60 step-by-step master classes for making paper crafts for the New Year. If you still think that only applications can be made from paper, then drop everything and carefully look at our article! Well, for those who are looking for something unusual and know what miracles can be created from ordinary paper, we can only advise you to immediately begin the process of creating New Year's paper crafts according to our schemes and templates.
One of the simplest New Year's paper crafts can rightly be considered a garland. We all remember well from our childhood how they decorated the Christmas tree with such paper garlands not only at home, but at school or kindergarten. A paper garland is made very simply: colored paper is cut into strips of the same width, the first strip is glued into a ring, and each subsequent one is threaded into the previous ring and also glued. This paper craft is perfect for 4-5 year olds.
If the task of entertaining children is not worth it, but you need to decorate the house, then here's another version of a paper garland for your note. It is made even easier than the previous one, but you will need a sewing machine. So, to create such a New Year's paper craft, you will need: a lot of circles of different diameters (the number depends on the size of the garland), a sewing machine. Sew circles through the center on a typewriter and hang a garland. From any gust of air, such a garland will “come to life”.

So, if you decide that the issue with garlands is closed and there is nothing else to think of here, we hasten to upset you - this is only the very tip of the iceberg. Simple paper garlands are an activity for beginners. Professionals prefer more complex tasks, such as voluminous paper crafts. Below is a master class on making a volumetric garland in the form of light bulbs.

By the way, you can decorate an ordinary LED garland with paper lanterns. This New Year's paper craft looks very cool, especially if you decorate the wall with this garland.

Interested in a garland? Then see more ideas:

New Year is the most beloved holiday associated with miracles and magic. The celebration of the new year is characterized by folk festivals and joyful meetings. It is impossible not to love this time of the year, when everything around is transformed, and every house or shop window becomes like scenery for a fairy tale. Everyone wants to participate in this transformation, and therefore they try to decorate their homes […]
Since we are talking about the decor of the apartment, it would be strange not to mention Christmas wreaths, or as they are also called New Year's wreaths. Everyone can make such a paper craft, in addition, a New Year's paper wreath is a reusable decoration that will not deteriorate and will not lose its appearance over time.

A very cool paper craft for the New Year is a wreath of roses. You will have to work hard to create such a craft, so if you decide to make yourself such a paper wreath on the door - stock up on patience and mood!

If you're planning a New Year's themed party, say Cuban or Hawaiian style, then you'll definitely need some kind of decoration to set the atmosphere. Here is such a simple, but very original wreath made of paper will come in handy!

Surely your child at school or in the garden was asked to make a Christmas wreath with their parents. Allegedly for a competition, but the main task of this task is to get parents to spend time with their children. But maybe you should not wait for a task from school, but spend time with your child yourself. In addition, with such a New Year's craft, you can decorate the house in a very original way, and most importantly, get a lot of positive emotions!

Need a Christmas wreath? See more ideas:

Preparing for the New Year is sometimes even more pleasant than the celebration itself. The whole family, including the youngest residents, can take part in the process of decorating the interior. You can decorate an apartment or house for the New Year holidays in a variety of ways, but recently New Year's wreaths, which are better known to us from romantic Hollywood Christmas films, have been very popular. However, trendy […]
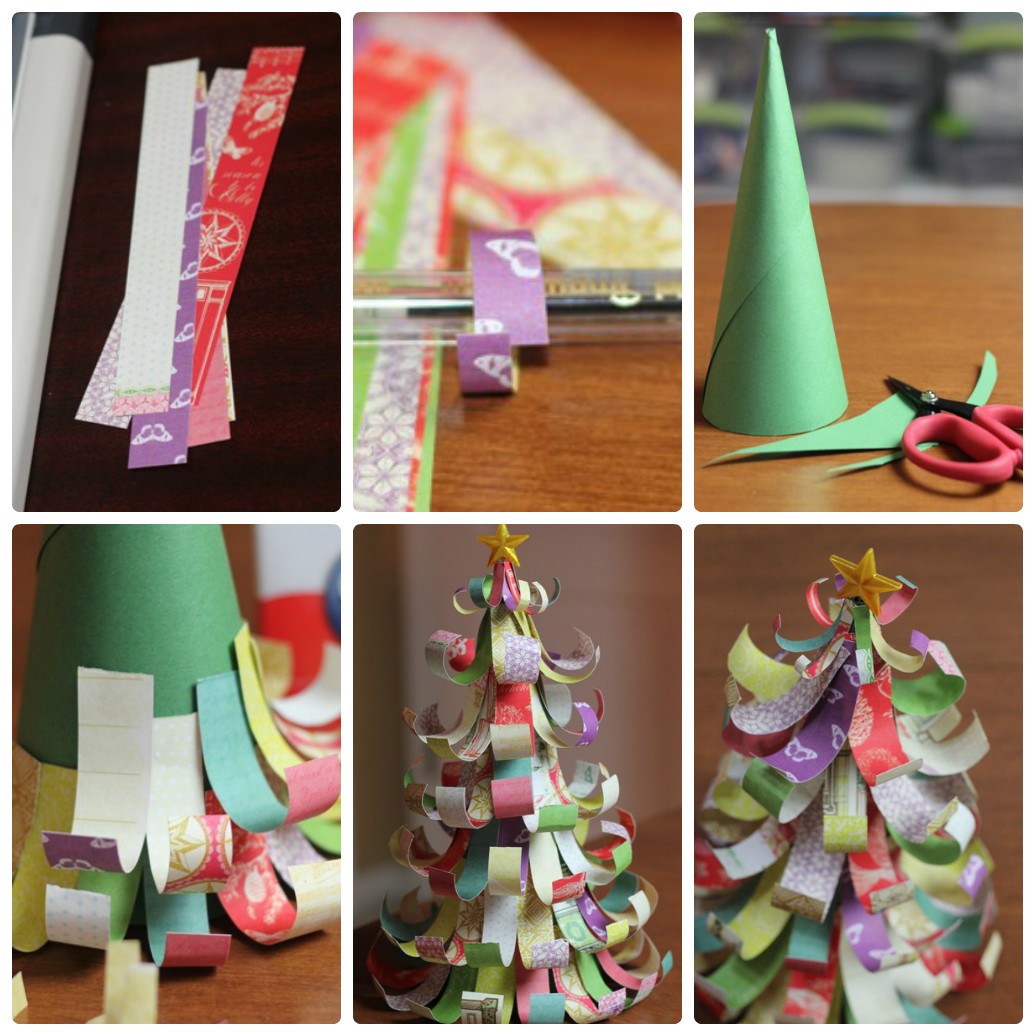
So, we continue to decorate the apartment. There is a garland, there is a wreath. Something is missing? Oh, of course, Christmas trees! If you prefer to put a big forest beauty on New Year's holidays, it doesn't matter. By the way, read on. Small paper Christmas trees make a great addition to the decor, and they can also be used as small souvenirs for guests!
# 10 New Year's paper crafts with our own hands: we make a Christmas tree toy "Herringbone"
A Christmas tree made of paper does not have to be on the table or somewhere in the house. You can make a craft out of paper, which you can then hang on the Christmas tree itself, and if there is no Christmas tree, then you can simply hang such voluminous paper Christmas trees around the house. The scheme for making a Christmas tree is quite simple, but if you don’t quite understand what the essence is, or you just don’t have time to figure it out, then you can download a ready-made template.

A very cute Christmas tree can be made from corrugated paper. This paper craft looks very realistic, but it is done quickly and easily.

If you are still interested in a paper Christmas tree, but you want to make something unusual, then use this master class.

The tree does not have to be on the floor, it can also be hung from the ceiling. An excellent Christmas garland will turn out from plain paper.

How to distinguish the New Year's table from the usual festive one? Everything is correct! According to thematic elements of decor. And how to make a suitable New Year's dessert, see.


Do you want more workshops on making paper Christmas trees? See:

The Christmas tree is, of course, the main attribute of the most important winter holiday. It will not be possible to do without the forest beauty, the atmosphere is not the same, and where does the good grandfather put the gifts? It so happened that a Christmas tree is decorated in the house for the New Year holidays: someone puts a live one, someone prefers an artificial one, and someone paper. A paper Christmas tree can not only replace a Christmas tree […]
#17 Christmas paper crafts: making a movable card with wishes
From paper, you can make not only flat or voluminous crafts, but also movable ones. With our ready-made scheme, you can make a postcard with an encrypted congratulation or message. Such an unusual gift will please not only children, but also adults! You can download the finished scheme below.


In winter, wild flowers are not to be found, even in flower shops. But there is nothing to worry about, flowers can be made from paper with your own hands. And our step-by-step master class will help you with this.

A wide variety of flowers can be made from paper, the whole secret is cutting out the ends.


If you want to make a big Christmas star for decorating a wall from paper tubes, then this master class is especially for you!

A very themed New Year craft made of crimped paper. Such a paper cone looks very natural and is quite difficult to distinguish, especially if it is used as a decor. With our master class, you can easily cope with such paper crafts.

There is another technique for creating paper cones with your own hands. This method is more labor intensive and will take you more time. In addition, to create such a New Year's craft, you will need: paper, a foam blank, a lot of safety pins, a ribbon and beads for decoration. However, if you have the time and desire, then pay special attention to this scheme for making a cone, especially if you want to impress.

From paper, you can make very special crafts using the Japanese origami technique. Our step-by-step master class will help you create a New Year's paper ball that can be used to decorate both a room and a Christmas tree.

A step-by-step diagram for creating an origami star with your own hands. You can decorate the top of the Christmas tree with such a star, you can simply create a festive atmosphere in the house, or you can combine it into one big garland.

You can make the base yourself, as in the first picture. Or you can download the finished pentagon blank and, depending on the size of the pentagon, the size of the finished star will change.


At your service is a step-by-step scheme for making a three-dimensional paper snowflake. Follow the instructions and you will definitely get such a miracle.

#34 We decorate the apartment with cones: do-it-yourself Christmas paper crafts
In continuation of New Year's paper crafts, I would like to offer you another scheme for making paper cones. In addition to paper circles, you will need an oval or round blank, glue and fir branches for decoration.

Another great option for decorating an apartment with your own hands is a large voluminous snowflake on the wall. A snowflake can be not one, but a whole ensemble. In addition, on such a New Year's background, you will get great photos!

New Year's gift must be in a beautiful package. In my opinion, the gift itself is not so much important as the intrigue around it. After all, it is this intrigue that will remain in the memory, this is a pleasant expectation and unfolding the paper. Use our scheme for making paper flowers with your own hands and decorate gifts for dear and close people.

It is customary to decorate a Christmas tree with toys, but these toys do not have to be purchased. Even better if they are made by hand. And what could be easier than making a Christmas tree toy out of paper. Use our step-by-step instructions and make your own paper Christmas ball.

Very simple, but incredibly cute voluminous lanterns can be made from ordinary colored paper. Even children can handle this craft, so feel free to get to work if you have little helpers. Well, if not, then you can do it yourself!

You can make completely unexpected crafts out of paper, including gift boxes. And not just boxes, but in the form of delicious sweets. For such a gift box you will need: cardboard cylinder, colored paper, glue, scissors, satin ribbon.

In continuation of the question of gift wrapping, we want to offer you another budget, but very charming option. You can make such a gift elf with your own hands using our master class.

Here is another version of the original packaging of a New Year's gift with your own hands.

Need more gift wrapping ideas? See:

On the eve of the New Year holidays, shop windows are full of gift boxes, decorative bags, wrapping paper for every taste. Smiling sellers helpfully offer to provide services for wrapping New Year's gifts. And all this seems to be great, because you must admit, it is much more pleasant to receive a New Year's trifle in a beautiful package. But on the other hand, the whole meaning of the gift is lost, the very gift that […]


Want more Christmas ball ideas? See:

Today, on the shelves of stores you can find a huge number of a wide variety of Christmas toys, so turning an ordinary Christmas tree into a real festive beauty is not difficult. However, the New Year is a special day! The day when the old year is left behind, and new adventures, new events, new victories await. But after all, the old year did not pass without a trace, […]


#55 A simple paper snowflake pattern: decorating a room for a party

#56 Do-it-yourself voluminous paper crafts: making a snowflake. Scheme


#58 Christmas paper crafts: decorate the house with diamond crystals
Download ready-made schemes and make your own paper diamond crystals.

#59 New Year craft paper ball "Mistletoe" with your own hands
Here you can make such a mistletoe paper ball with your own hands, using ready-made cutting templates. Stock up on patience and New Year's mood!


You can decorate a house not only with standard snowflakes or stars. You can make such a wonderful vase out of paper. Download the finished scheme and assemble the vase following the instructions in the master class.

A wide variety of decorative elements can be made from plain paper, just download the finished scheme, print it, cut it out and glue it. A wonderful Christmas paper craft is ready!

#64 Christmas patterns for cutting: a great photo shoot for the new year
Note! The templates are very large and of good quality, so the download may take some time.

Simple Christmas decorations can be made from paper. In our master class, an example with a ball is given, but it can be other shapes: hearts, stars, Christmas trees and much more. You can download ready-made templates below.

You can make a simple and original Chinese lantern with your own hands using our ready-made scheme.

An excellent decoration for the new year will be a composite paper star. You can download a ready-made template for gluing below.

In our time, you will not surprise anyone with ordinary paper cutters. Volumetric crafts cause much more delight. In this master class, a scheme for creating a simple volumetric star is described step by step. You can download a ready-made template with a large, medium and small star from the link below.

It is quite difficult to imagine a New Year's decor without all sorts of variations on the theme of stars. In this master class, you will learn how to make a volumetric double-sided star out of paper with your own hands. You can download the finished scheme below.

#70 Christmas paper masks
Carnival masks must be included in the list of New Year's paper crafts. Well, what New Year's party can do without masks? That's right, none! In fact, there are a lot of options for making paper masks, and if you turn on your imagination, you can make many wonderful crafts!

Paper crafts can be made both for yourself and for sale In modern schools and preschool institutions, much attention is paid to working with paper. Both kids and schoolchildren love to create original paper crafts. Working with her, the child develops his imagination, learns to think creatively, and also develops fine motor skills of fingers.
Simple voluminous gift boxes or voluminous figures can be made by hand by drawing a diagram on a piece of paper. Many crafts are almost impossible to put together without diagrams. Thanks to the templates, you can create complex voluminous fakes from colored paper or cardboard. Beautiful knick-knacks, furniture models and much more - any art lover can do.
Schemes and templates for creating paper crafts can be purchased online or at a craft store.
To do this, you need to find on the Internet, for example, on the website of the Country of Masters, any template you like. Animals, birds, toys - everything can be created using ready-made templates and schemes.
Each template comes with instructions on how to assemble the craft. The template needs to be downloaded, printed on a printer, cut out a figure along the contour. On each figure on the template, dotted lines will be drawn along which the model should be folded. Glue the finished model with glue.
Easy paper crafts for kids
Children show interest in paper from childhood. To instill a love of creativity, parents should captivate the child with the creation of a variety of paper crafts. You can make a beautiful bright bird craft that a child can play with or use it to decorate a bedroom.
A simple cardboard bird:
- According to the template, cut out the shape of a bird, draw a beak, feathers, a tail.
- Fold an accordion from a square sheet of colored paper.
- Make a hole and fasten the wings in it.
Paper craft in the form of a turtle is good for children
If you cut out a few birds, you can make a Chinese breeze according to Feng Shui. By hanging the birds on a wooden stick, you can steal the entrance to the children's room with such a craft.
All cutting work must be carried out by adults or under their close supervision!
After working with paper, the child should put the entire tool in a box. This is how precision is developed.
Stylish cardboard and paper crafts: three-dimensional paintings
Application is considered the simplest paper craft, it is often studied in elementary school. A beautiful three-dimensional picture of bright flowers will be an original gift from a child to a mother or grandmother. Flowers can be made from white toilet paper or napkins.
If you take toilet paper for crafts, it is better to use expensive white perforated paper, which can then be slightly painted over.
Working with napkins is very simple, but you need to be careful not to accidentally tear it. Therefore, you should be especially careful when creating such crafts.
A volumetric castle made of paper is a great toy for a child.
Progress:
- Fold the napkin in four, fasten with a stapler in the middle. Cut out a circle from a napkin
- Raise each layer of the napkin in turn, forming a lush flower.
- From green paper, cut 6-7 leaves according to the pattern.
- Cut out a basket from brown paper, stick it on a thick red sheet of cardboard. Arrange flowers and leaves in the basket.
The basket can be made from corrugated paper of any color, but it is advisable to stick it in a couple of layers. Instead of paper, you can use foil for baking or from chocolate bars.
Interesting paper crafts: weaving
There are a lot of ways to weave paper crafts, this is a very interesting and original way to create crafts.
The simplest thing is to plait strips of paper between each other in a checkerboard pattern, creating an object. A more complicated way is weaving from paper twisted into tubes.
Depending on which paper you choose, your craft will have special properties.
Thanks to paper, you can make a practical chessboard
There are several options:
- Newspaper;
- Glossy magazine;
- Tape for cash registers;
- Plain paper.
Note that it is easier to work with paper, which is durable - the craft, respectively, will come out more durable. An original drawing will come out of glossy magazines.
Do not intertwine different types of papers. Thick paper may not be intertwined with thin paper, and sometimes it can tear it.
Finished products can be decorated with ribbons, beads, quilling flowers, everything that your imagination is capable of.
How to make paper crafts: preparing paper tubes
Weaving from paper tubes is a very entertaining art. You can make tubes from magazine sheets - the material is quite dense and bright pictures will become an original pattern on the basket.
For manufacturing you will need:
- Paper;
- Scissors;
- Pencil;
- Ruler;
- Glue;
- Knitting needles.
To prevent paper tubes from tearing, thick paper should be used in their manufacture.
First, let's prepare the tubes. Ribbons with a width of 90 mm of any length are simply wound on a knitting needle. We glue the edge, take out the knitting needle, leaving a couple of centimeters inside the tube, glue the second edge.
It is desirable to wind tightly, the accuracy of the product depends on this. Do not be distracted by extraneous matters, so the progress of work is lost.
By gradually pulling out the needle and building paper on it, you can lengthen your tube to the desired size. To weave a basket, the length of the tube should be such that it is convenient for you to bend it.
Beautiful basket: paper crafts in stages
So, we made blanks, in addition to this, you will need a piece of durable cardboard, scissors and glue. From the cardboard you need to cut the bottom of the future basket. To do this, according to any template, cut out two cardboard circles.
Now you can start weaving baskets:
- Glue paper tubes around the circle on the first cardboard circle. Glue the second circle onto the tubes.
- We lift the tubes up and fasten with an elastic band.
- Glue the end of one tube to the base, then grab the standing tube from the outside, lead it inward and grab the second tube from the inside.
- We alternate "outside-inside" until the tube ends.
- To lengthen the tube, you need to insert a new vine at the end of the previous one.
- In order for the basket to have a certain shape, when weaving it is better to insert a bottle or jar inside.
- Weave all rows to the required height.
- If there is a piece of vine left, do not cut it, it is better to fix it inside the finished basket. For fidelity, you can stick to one of the tubes.
- Frame tubes can be glued to the walls of the basket.
- We paint the finished product with acrylic paint, wait for complete drying and paint over again.
A paper basket is a great decor element for any room.
The decorative basket is ready, you can put a small artificial flower there or adapt it for hairpins and rubber bands.
Simple paper crafts: an angel on a Christmas tree
For the New Year, I really want to decorate the house with beautiful decor. The easiest way is to make beautiful paper crafts yourself with a little effort. Even a child of 4-5 years old can make an angel craft under the supervision of their parents.
How to make a Christmas angel step by step:
- Cut out two squares of 10x10 cm from colored paper. Fold them like an accordion.
- Make a bend on the accordions, stepping back from the end of 3 cm. Bend one accordion to the right, the second to the left.
- Glue the bent fold to the bottom of the fan.
- To make the head, you need to cut 4-5 strips of paper as wide as the edge of the fan. We wind the strips on top of each other, forming a tight circle. Fix the size of the head with glue.
- Place the rest of the paper down.
- Glue the halves together. Angel is ready.
Using paper, you can make original decorations for the Christmas tree in the form of angels
If you want to decorate a Christmas tree with an angel, you can tie a serpentine to a halo and hang the craft on a branch.
You can also plant it on top of the tree. To keep it, just attach the craft to the branch with a regular clothespin.
White Paper Crafts: Volumetric Snowflake
Volumetric snowflakes look spectacular, besides, they can decorate an apartment before the holiday and decorate a Christmas tree. To create such a craft, you will need paper, scissors, glue.
How to make a three-dimensional snowflake step by step:
- Cut out 6 squares from sheets of paper.
- Fold the square in half to make a triangle. Make cuts from the bottom fold towards the top corner. The cuts should not meet, you need to leave a small gap between them. Thus, make 3 triangular cuts.
- Unfold the sheet and place it in front of you in the form of a diamond.
- Fold the first inner row of strips together, fix with glue.
- Turn the craft over, repeat step 4 with the following strips.
- Turn over and fasten all remaining strips.
- In a similar way, make 6 parts of a snowflake.
- Fasten together in 3 parts with a stapler.
- Glue the two halves together.
Volumetric snowflakes made of white paper are well suited for decorating a house for the New Year.
When working, it is better to use glue with a brush or a glue stick.
If, when gluing, a loop-ribbon is placed in the center, the finished craft can be hung anywhere.
White and colored paper is suitable for work. A snowflake made of paper will look very unusual, where one side is colored and the other is white.
The easiest children's paper crafts without scissors
Easy and beautiful craft for kids - "The Universe through the eyes of a child." The figure can depict the month, stars and other celestial bodies. This craft can be done without cutting.
To work, you will need very few materials - glue, confetti (or small pieces of torn paper) and a dark blue sheet of cardboard.
How to do:
- Collect confetti from crackers or cut out a bunch of small circles of multi-colored paper with a hole punch.
- Take a stencil and apply a drawing on a sheet - a crescent, stars and planets.
- Paint over the drawn figures with PVA and, until it is dry, sprinkle with ready-made confetti.
The finished picture can be decorated with a shiny frame, for it you need to finely chop the New Year's rain and stick it along the contour of the picture in the same way.
There are a wide variety of paper crafts you can do without scissors.
Work with such crafts can be carried out even with preschool children - in kindergartens or early development circles.
Applications can also be decorated in this way. Decorating, for example, a Christmas tree cut out of a green leaf, you can make a beautiful New Year's craft.
Fascinating paper crafts for children: mobile toys
Such toys are very interesting for children. You pull the string, and the animal or doll moves arms and legs. In fact, making such a figure is quite easy.
An entertaining puppet toy can also be made from plywood, but since cardboard is more malleable in manufacturing, we will analyze this option better.
To work, you will need cardboard, a couple of buttons, thin wire, scissors, strong thread and bards.
Movable paper toys are a great gift for a child.
How to make a puppet dog:
- Moving parts (paws and tail) are drawn on cardboard separately and cut out.
- Subsequently, at these points, we make fastenings with wire or bards. Buttons can be used as a stopper.
- We glue the torso and head with adhesive tape or glue to a bamboo stick.
- We insert into the pre-made holes in the paws along the mount and combine with the body. We tie the paws together with a thread or elastic band. To do this, we make two additional holes in each foot so that they are located closest to each other, and the thread is not visible from the front side.
- In the same way we fasten the tail and connect it to the hind leg.
- After we tie another long thread to the one between the legs, it will set in motion all the moving limbs.
- The final stage of painting, at your discretion.
Having performed a cat, a fox, a hare using a similar technology, you can arrange a puppet theater for kids. Every child will like a play based on their favorite fairy tale with the participation of animals.
Paper crafts without glue: simple origami for kids
The origami technique is quite complicated, but you really want to make your child an interesting voluminous toy with your own hands.
This chicken is one of the most interesting and relatively simple crafts. The sheet of paper must be square.
Tip: if you go when tearing off to avoid severely torn edges, fold the sheet in both directions.
When choosing a future composition for creating origami, you should choose crafts without complex elements
For cutting, you can use scissors or a ruler with a sharp clerical knife.
Origami chicken step by step:
- Fold the square sheet diagonally. Unfold, fold in half.
- Having unfolded, we bend the left and right corners of the square inward, combining them in the middle of the square. The result is a pentagon.
- We bend the top of the cone in the middle. Then we bend the same cone in the opposite direction, so that a small corner protrudes beyond the border of the sheet - the future beak.
- We combine the left and right sides of the whole craft, put it so that the beak is on the left.
- We bend the upper right corner into the middle of the product.
- The lower right corner, it consists of two sheets, we bend them outward of the product. We do this by combining the lower sides, while we bring a small corner beyond the extreme left border - these are the legs of the chicken.
- We turn out a small corner-tail.
- We lower the beak a little. You can paint over with a regular red pencil for more realism. Draw eyes.
Such a craft can surprise a child, intrigue him. Having aroused interest in the toy, you can enlist the baby to help create a similar origami next time.
Master class: do-it-yourself paper crafts (video)
In fact, you can make so many crafts out of paper and cardboard that you can’t list them - animals, birds, cars, dolls. They can be voluminous or simple, colored or white. The richer your imagination, the more interesting the craft is.
For many years, paper crafts have been considered one of the most popular types of needlework. With an enviable frequency, new approaches to it and the most diverse branches of this direction appear - here are kirigami, and modern papercrafting and much more. Below we will talk about how to make paper crafts with your own hands using simple schemes.
With a little time for learning, even any child can handle the listed instructions without any problems.

The first thing to do is to prepare colored paper, any glue and small scissors. In addition, rhinestones and other materials can be useful for work in order to give the creation a complete look.

Simple paper crafts
Most often, all children from early childhood show a special interest in precisely such material as paper, and this must be used for their own good. To instill a love for this kind of creativity, mom and dad can go to the trick and captivate the child by creating toys by showing photos of hand-made paper crafts that they themselves liked the most.


You can literally cut out a cute bunny or, for example, a bird in just thirty minutes or even less, with which the child can later play or use them as a decor for a child's room.

How to make a cardboard bird
- Using the template, cut out the bird in shape, draw feathers, a key and a tail for it;
- Fold a sheet into an accordion in the shape of a square of any color;
- Make a hole and finally fix the wings of the bird in it.

If the child likes to make a bird, then you should not be limited to just one. By hanging a few paper birds on a simple wooden stick, you can turn them into an interesting craft to decorate the entrance, for example, to a children's room or a corridor.

Please note that absolutely all complex work in which something is required to be cut must necessarily be carried out either personally by adults at first, or under their control.

In order for the child to develop accuracy, it is necessary to ask him, after completing the work, to put all the tools in the prepared box.


How to make a three-dimensional picture using paper and cardboard?
The easiest paper crafts are applications that are taught to do in the elementary grades of the school.

Of course, a beautiful and at the same time still voluminous picture made by hand from bright colors can be an excellent gift for a sister or grandmother from a child. At the same time, it is not at all necessary to spend money on expensive colored paper, since today, according to the instructions, flowers can be made, in principle, from any napkins or even toilet paper.

If you decide to choose the second option and make your own crafts from the toilet paper at hand, then it is better to give preference to more expensive paper, on which there will be perforation. It can be painted over a little in the future.

With napkins, as practice shows, it is even easier to work and it is only important to ensure that you do not accidentally tear it during the work.

The sequence of actions should be as follows.
- First, you need to fold the napkin four times, securing it in the very middle with a stapler.
- Secondly, a circle is carefully cut out of the napkin and lifting each of its layers in turn, a rather lush flower is obtained.
- Thirdly, about 10 leaves must be cut out of the prepared dark green paper using a template.
- Fourthly, a basket should be cut out of brown paper and pasted on a thick cardboard sheet of any color.

It remains only to place flowers with leaves in the basket. If you want something original, then you can try to make a basket, for example, from corrugated paper or foil, which is used for baking.

Paper crafts for the new year
Classic snowflakes can be an excellent paper decoration for the new year. There are a huge number of different options for how to make beautiful paper snowflakes, most of which a child can easily do by repeating simple steps after their parents.

No less popular crafts are paper balls or a garland. To make them look more interesting and unusual, you can sprinkle the product a little with bright iridescent sparkles.


Balls will look interesting if you make them openwork. The easiest way to make such a ball with your own hands is to find its diagram, then carefully cut out the figure and glue it.

In conclusion, it is worth noting that any paper craft will look good if it was made with a soul.

DIY paper craft photo


The art of needlework is often associated in people with something that is undoubtedly too tricky and complicated. That is why few people dare to "put their hands" on creativity and build something interesting that they do not sell in stores - a thing made with a soul, and this is precisely the main characteristic of hand-made crafts. Creativity is not only painstaking embroidery on a thin canvas with floss threads or beads, not only crocheting patterned napkins and lace scarves. Creativity can be as simple as possible, but no less beautiful. This is especially important for a child. Children can and should be taught to do things themselves. Thus, they actively activate the process of not only artistic, but also logical thinking. Yes, and classes with the baby will turn into an exciting evening, not only for him, but also for the parent.
comes from childhood
Who among us has not folded airplanes? Absolutely everyone, without exception, knows their scheme, and many can certainly boast that they are able to put it together with their eyes closed. And no wonder: after all, airplanes often flew not only at home or on the street during the game, but also in school classes during recess. Another favorite spring and summer game was launching paper boats in the stream. And although their "life" was short, this game did not cease to be exciting.
And besides these simple paper items, you can create many others, no less light, but more beautiful. Having only two squares of red and green double-sided paper at your disposal, using a simple scheme that is very reminiscent of the same boat at the first steps, you can fold a beautiful tulip. And from other multi-colored rectangles, you can easily fold houses that are very similar to real ones. They will become not only a "reference point" for children's creativity, but they will also be able to be involved in the child's games.
Simple and stylish room decoration
You can decorate a room not only with porcelain figurines, photographs and paintings, but also with quite simple paper crafts. Especially they become relevant when the room needs to be decorated for a party or a themed evening.
Yes, maybe just absolutely on any other day, hearts create a special romantic mood. A few sheets of paper in different shades of red and pink, cardboard for the base - that's all you need to decorate! Simple cutout hearts of various shapes or voluminous, which is achieved by gluing the upper part between the two halves - this is incredibly simple, but also very beautiful.
Hanging garlands-mobiles can decorate not only a crib, they can be attached to the ceiling by tying ribbons on sticks folded crosswise, at the ends of which there will be products of one’s own imagination: animals cut out of paper, geometric shapes and much more. The most important thing is not to be afraid to do something with your own hands, because it is difficult only at first glance. This section contains the easiest paper crafts that everyone can repeat with their own hands.
Colored paper is an excellent material for crafts. You can make applications, various figures and many other creative things from it. In this article we will consider: how to make crafts from colored paper for primary school children with their own hands.
You will need: thick colored paper, glue gun, ruler, scissors, adhesive tape, stationery gum, pencil, pen spring.
Master Class
- Take a sheet of paper and a pencil, twist the tube diagonally from the corner, then fix it with tape and pull out the pencil.

- Twist the second sheet of paper around the first tube, then pull them apart. The second paper tube should be slightly larger in diameter than the first so that it can be fired from in the future.
- Fix the second tube with tape, then cut off the edges.
- Twist 2 more paper tubes in the same way.
- Cut the tubes into segments of this length: trunk - 2 tubes 15 cm long; handle - 7 tubes 5 cm long; trigger - 1 tube 8 cm long.
- Glue 5 cm tubes diagonally to make a handle.

- Glue the 8cm tube on top of the handle so that the remaining 3cm protrude to the right. This is a trigger.
- Glue two 15cm tubes together and glue to the top of the gun as a barrel.
- Twist two thin tubes from yellow paper.
- Bend the thin tube into a "U" shape and insert one end into the trigger and the other end into the top tube of the handle. Cut off the excess. This will be the trigger.
- Make a trigger guard from the second thin tube. To do this, place one end of the tube in the handle (in the second tube from the top) and glue the rest of the tube to the bottom of the barrel.

- Twist the pink paper tube, flatten it and tape the handle as shown in the image. It is worth noting that the rear hole in the trigger must be open.
- Remove the trigger from the top tube of the handle and insert the spring. It is worth noting that the spring should rest against the tube covering the back of the handle. Reinsert the trigger.
- Twist a thin thick tube of yellow paper, secure with tape and cut off the edges so that they are even.

- Bend the edge, put on an elastic band and fix with glue.
- Insert the tube with the rubber band into the down tube of the gun barrel and pull the rubber band forward, hooking it between the two tubes.
- Roll up bullets out of paper, load the gun and shoot.
You will need: colored cardboard, scissors, glue stick, cotton wool, stapler.
Master Class

The rainbow in the clouds is ready!
Binoculars
You will need: yellow cellophane, scissors, adhesive tape, black paint, brush, green and black paper, glue, rubber band, wine cork, string or elastic band.
Master Class
- Cut out 2 circles of yellow cellophane and stick with tape on the circumference of the bushings as binocular lenses.

- Paint the circumference of the wine cork with black paint and cover it with green paper.
- Tape the sleeves with green paper and glue the black stripes as shown in the image.

- Glue the bushings together and fix by putting on a clerical gum. After a while, remove the gum.

- Glue the glued cork between the bushings.

- Prepare an elastic band or rope of the desired length, make a hole on the side of the bushings and fasten the elastic band.
Binoculars are ready!
Origami rose
You will need: double-sided colored paper, scissors, a simple pencil.
Master Class
- Fold a sheet of colored paper diagonally as shown in the photo and cut off the excess strip to make a square.
- Bend the square to form a second diagonal.

- Bend the square in half to form lines like a snowflake.
- Move the sides of the workpiece in this way: the top - from the right side to the left, and the bottom - from the left to the right, to make a triangle.
- Bend all 4 peaks to the middle and run your fingers along the folds.
- Expand the workpiece to a double triangle and fold the top corner back.

- Spread the bud and bend the folded corner inward.
- Gather the double corner back and run your fingers through the folds.
- Raise 4 side corners to the top.

- Flip over, then fold each side to the center to the middle. You should get a blank with a hole at the bottom.
- Blow strongly into the hole from below to straighten the bud.
- Twist the petals using a simple pencil.

- Take the strip of paper cut off at the beginning.
- Fold the stem and insert it into the bud.
The origami rose is ready!
Moving 3Dfish
You will need: colored paper, scissors, glue, pencil, black felt-tip pen.
Master Class
- Take a sheet of blue paper and make a square.
- Fold the sides to the fold line, then open the paper.

- Fold the paper in half in such a way that you get a triangle, as shown in the image.
- Make cuts along the fold line, then open the paper and glue the overlapped parts that are not cut.
- Flatten the fish's face by cutting off a corner.

- Cut out the fins and tail from the pink, then draw stripes with a felt-tip pen.
- Cut out the eyes from white paper and draw the pupils with a black felt-tip pen.

- Glue the fins, tail and eyes, also do not forget to draw eyelashes.

- Cut out an elongated semi-oval and glue it as the lower jaw.
You will need: a sheet of colored paper, a felt-tip pen and scissors.
Master Class
- Fold a sheet of colored paper in half.
- Place your palm on the piece of paper so that the thumb and forefinger touch the edge of the piece of paper, thereby forming a half heart.
- Circle your palm.
- Cut out the palm and unfold the craft.
The heart in the hands of colored paper is ready!
You will need: colored paper in white and yellow, a simple pencil, ruler, glue, coin or compass.
Master Class
- Cut 9 strips of paper to the same size.
- Make 2 circles on yellow paper.
- Cut them out.
- Glue the ends of the strips to form petals.
- Glue the petals to the yellow circle, then glue the second circle on top.
You will need: red colored paper, a simple pencil, scissors, a round object.
Master Class
- Trace a round object on colored paper.
- Draw a spiral in the circle.
- Cut out the circle.
- Cut the spiral in such a way that you get a "spring"
- Twist the rosette, in the same way make the desired number of roses.
Original colored paper roses are ready! I recommend watching the video tutorial!
You will need: double-sided colored paper, glue gun, stick or skewer as a stem, button.
Master Class

A creative flower made of colored paper is ready!
You will need: 4 sheets of colored paper, double-sided tape.
Master Class
- Fold each sheet into an accordion.
- Fold each harmonica in half to form a fan.
- Glue 4 sheets together in such a way that you get a circle.
A fan flower made of colored paper is ready!
You will need: colored paper, stapler, cut out butterfly (from a magazine, notebooks, pictures), felt-tip pen.
Master Class

A case for surprises made of colored paper is ready!
You will need: colored paper in black and yellow, a simple pencil, scissors, ruler, glue, compasses, sequins.
Master Class

Colored paper owl is ready!
You can also make a cute bunny out of colored paper, but see how in this video!
colored paper sisters
You will need: paper of two colors, 2 wooden sticks, buttons for the eyes, rubber bands or ropes for hands, pencil, glue.


